PC-Compatible Devices
User Guide
FAQ
Govee Desktop is Govee PC App, which enables you to control Govee smart devices from your computer.
Core Features: Centralized device management, screen-synced lighting (Movie-Watching/Gaming DreamView), music-responsive lighting (Music DreamView), and Razer Chroma Connect.
Preparation
For Mobile
Lighting Devices
● Make sure your Govee smart lighting devices have already connected to Wi-Fi and added to Govee Home App.
● Enable “LAN Control” on the “Device Settings” page in Govee Home App.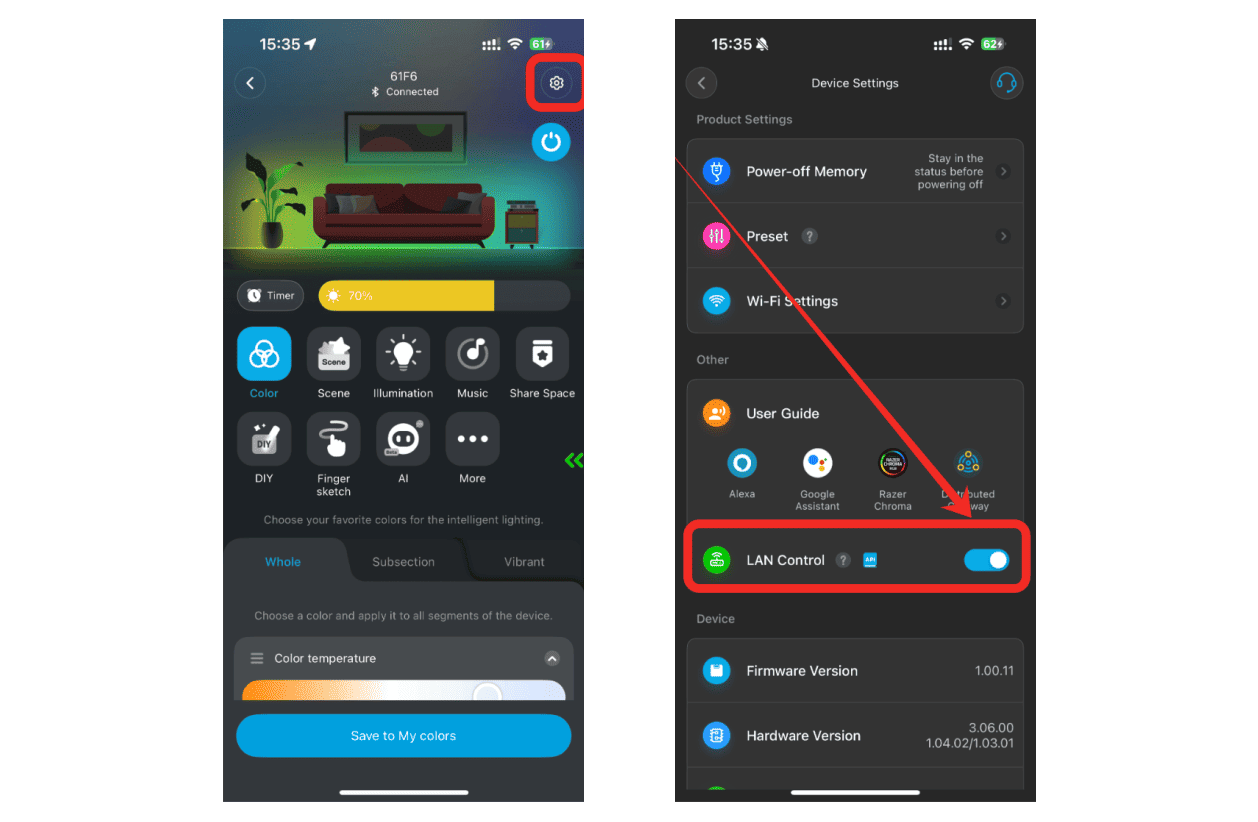
Home Appliances
● Make sure all appliances are connected to Wi-Fi and added to Govee Home App.
● It is suggested to upgrade the firmware of all appliances to the latest version.
For PC
● Download and install the latest version of Govee Desktop.
● Make sure the computer and Govee appliances are connected to the same LAN.
● Log in to Govee Desktop with your Govee Home account or scan the QR code with Govee Home App.
● After logging in, supported devices added to Govee Home App and Govee Desktop will automatically be displayed on the “Device List” page.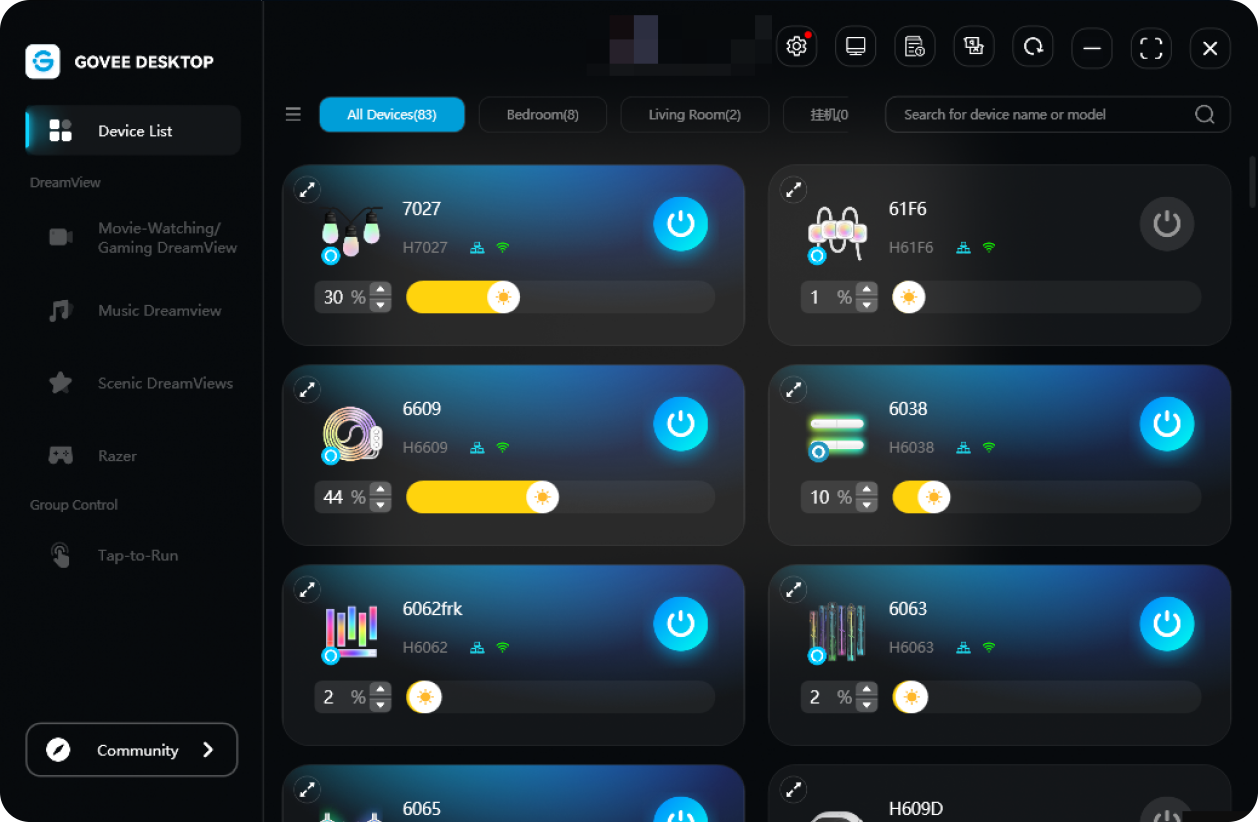
Device Connection Status and Control Feature Instructions
Connection and Displayed Devices
Operating Steps
1. Finish the above preparations.
2. Start Govee Desktop and log in.
3. The software will automatically load and display all devices that can be controlled with Govee Desktop. These will will be displayed on the “Device List” page.
If you want to know more details about what devices can be controlled by Govee Desktop, click Devices Supporting PC to view.
Device Connection Status Display
Wi-Fi Connection Status
 Connected: Devices can be controlled through Wi-Fi.
 Disconnected: Devices can’t be controlled through Wi-Fi.
LAN Connection Status
 Connected: Devices can be controlled through LAN.
 Disconnected: Devices can’t be controlled through LAN.
Lighting Devices: Display Wi-Fi and LAN connection status.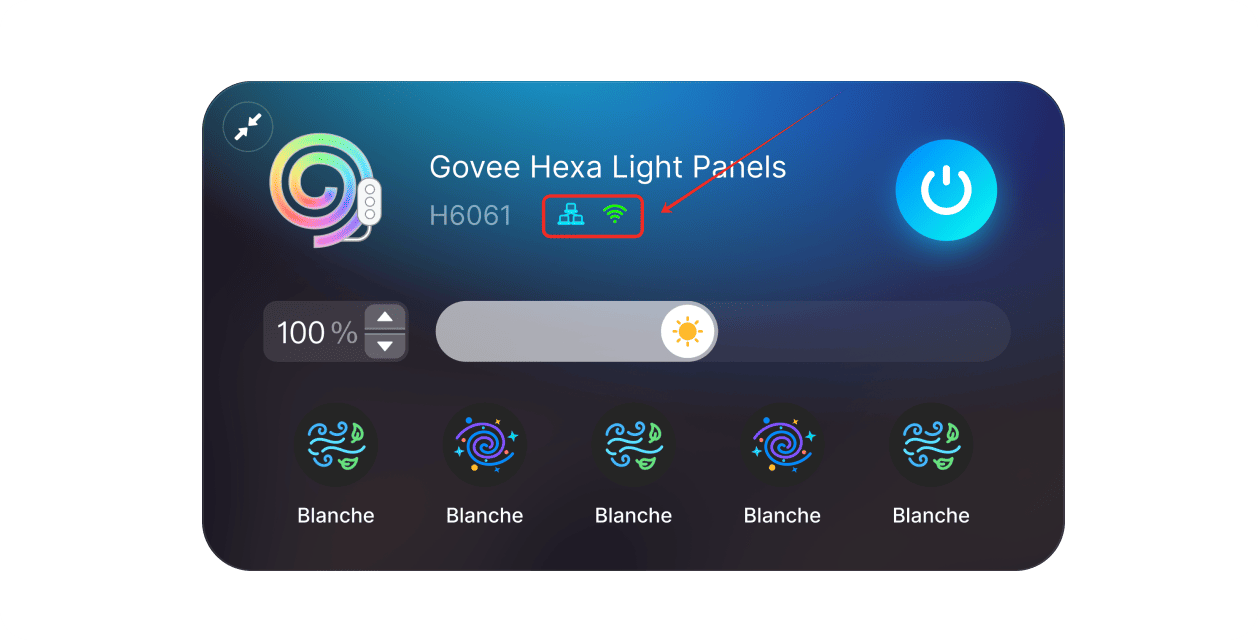
Home Appliances: Only display Wi-Fi connection status.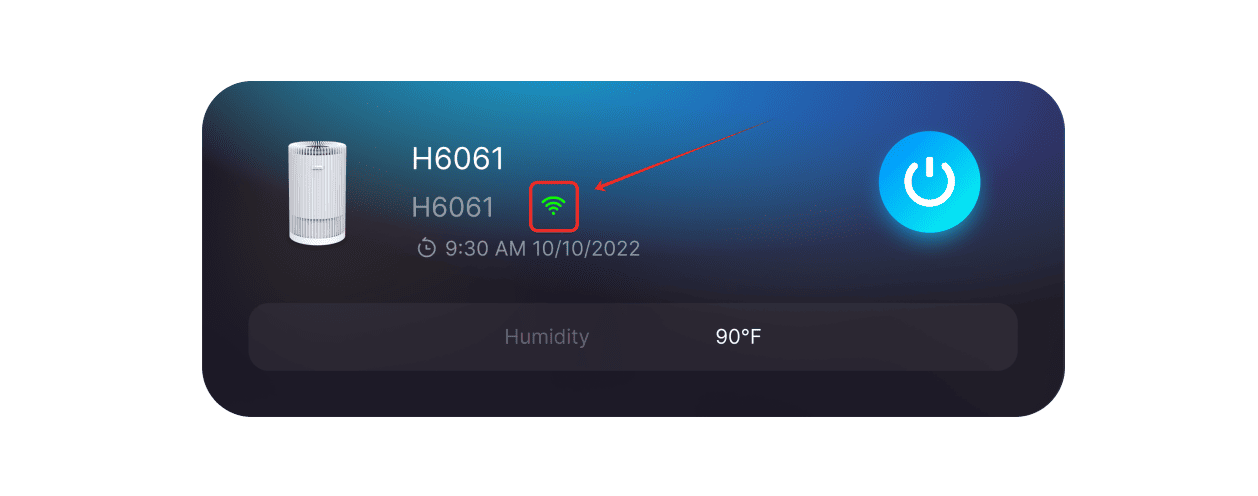
Influence of Connection Status on Features
Different connection statuses may affect the availability of part of the advanced features:
Basic Control: If you need to turn the device on/off, control the lighting effects, or use “Auto Run” or “Scenic DreamView” feature, make sure either Wi-Fi or LAN is normally connected.
Advanced Features: If you need to use “Movie-Watching/Gaming DreamView”, “Music DreamView” or “Razer Chroma Connect” feature, make sure the LAN is well connected.
Detailed Movie-Watching/Gaming DreamView Feature Explanation
Feature Introduction
Capture the colors of the computer screen in real-time and synchronize them with the lighting devices to create an immersive viewing and gaming atmosphere.
Create and Set Movie-Watching/Gaming DreamView
Step 1: Create and set Movie-Watching/Gaming DreamView and select devices
Click to create Movie-Watching/Gaming DreamView, and select corresponding lighting devices from the list.
Note: If the device checkbox is hidden, it indicates that it is unavailable. Hover the mouse over the device list to see why:
Device does not support Movie-Watching/Gaming DreamView (Please go to “Devices Supporting PC” – List of devices supporting Movie-Watching/Gaming DreamView).
LAN is not connected (make sure the device is plugged into power, connected to Wi-Fi, and share the LAN with the computer.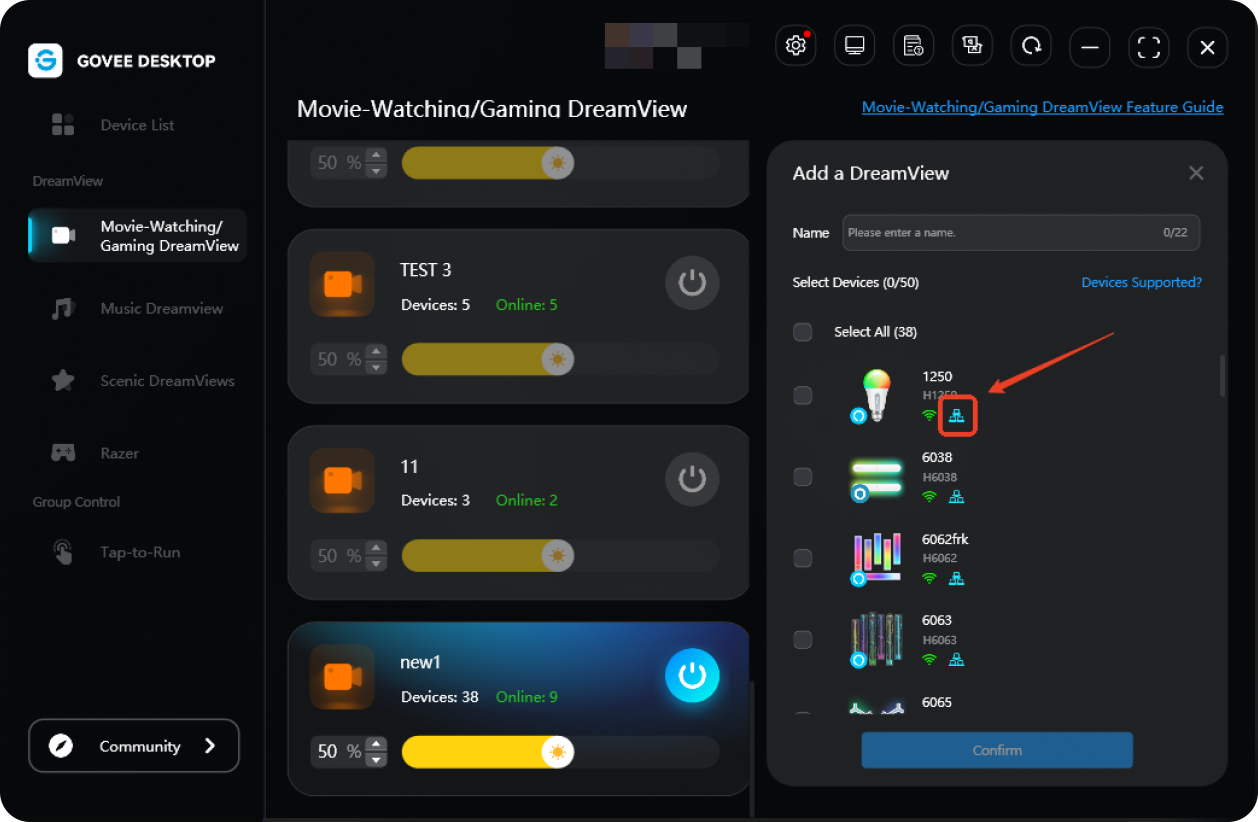
Step 2: Set the Screen Area and Device Segment Mapping
Enter the “Area Settings” page.
To ensure lights respond precisely to colors in different screen areas, map each color-picking area on the left with the corresponding device lighting segment on the right. This synchronizes lighting effects with the screen, creating an immersive viewing experience.
Auto Map: All device segments are automatically mapped with their corresponding screen areas and display IDs. You can customize these associations as needed.
Manual Adjustment:
Select Area: Click to select a target color-picking area on the left.
Map Device: After selecting the area, click the device segment on the right you wish to map, filling it in the segment.
Verify Effect: Check whether the lighting color of that device segment changes to match the selected color-picking area to confirm successful mapping.
Loading failed, please try again
Tap to retry
If the color-picking area size or the area number does not meet your needs, you can customize a new color-picking area template.
Add New Template: Click “Add New Template” to create one. Up to five custom templates can be created under each “Movie-Watching/Gaming DreamView”. For specific area division and editing methods, you can click on “Operation Instructions” to view the details.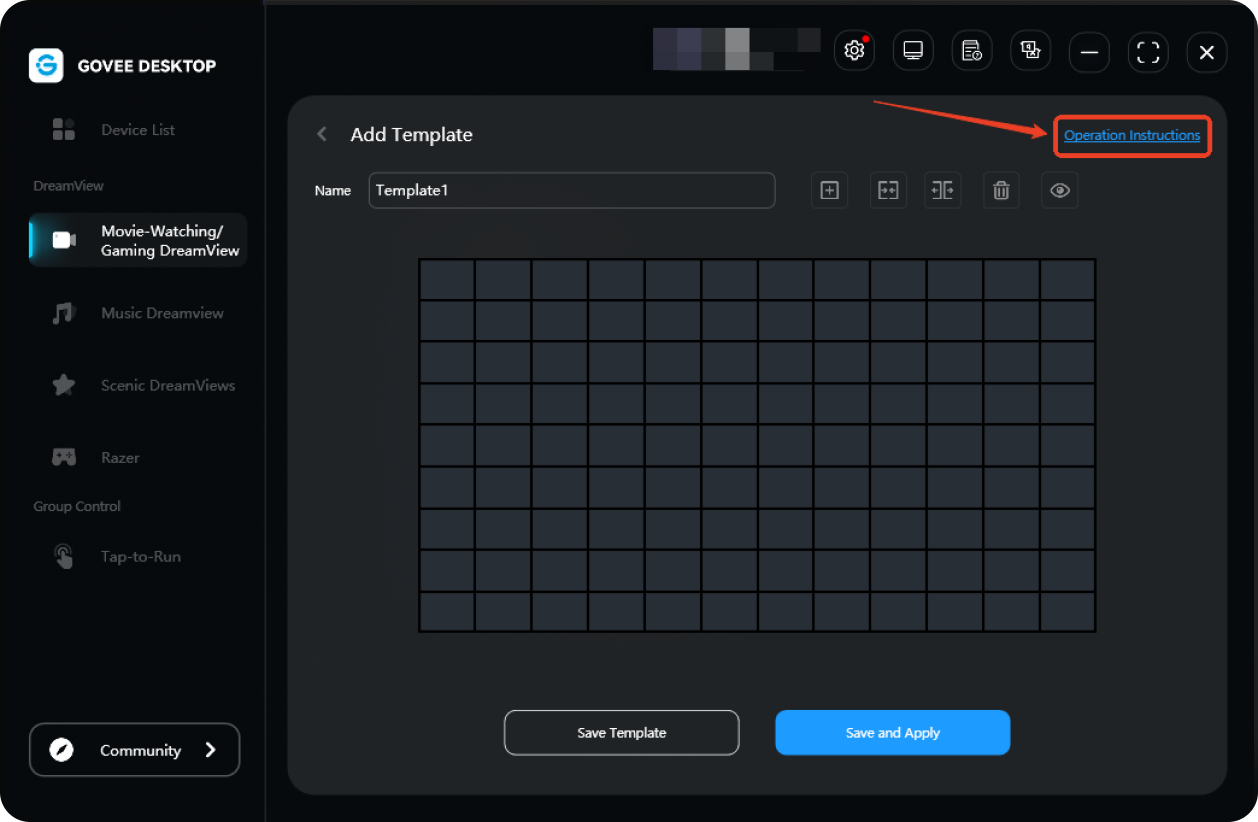
Save Template: After editing, you can click “Save Template” to save it to the list or click “Save and Apply Template” to apply it directly.
Management and Use: All saved templates under Movie-Watching/Gaming DreamView can be viewed and used by entering their corresponding “Area Settings” page.
Step 3: Adjust Lighting Effect Parameters
You can adjust the following parameters in the control panel of Movie-Watching/Gaming DreamView to customize the lighting effects.
Brightness: Control the overall light intensity. (To adjust a specific device individually, drag the brightness slider on its corresponding device card in the control panel.)
Saturation: Adjusts the vividness of light colors. Higher values produce more intense colors.
Sensitivity: Determines how quickly lights respond to screen changes. Higher values result in faster light transitions; lower values yield smoother changes.
When creating or editing a DreamView, all adjustments made in the control panel will be saved in real time. The next time you need to use it, simply select its name directly from the “Movie-Watching/Gaming DreamView” list to activate it. Your previous settings will take effect immediately.
Movie-Watching/Gaming DreamView Feature – Software Settings
Display Settings: Go to “Settings” – “DreamView” – “Color-Picking Screen” to select the main display or the secondary display as the source for the image used for color picking of the lights.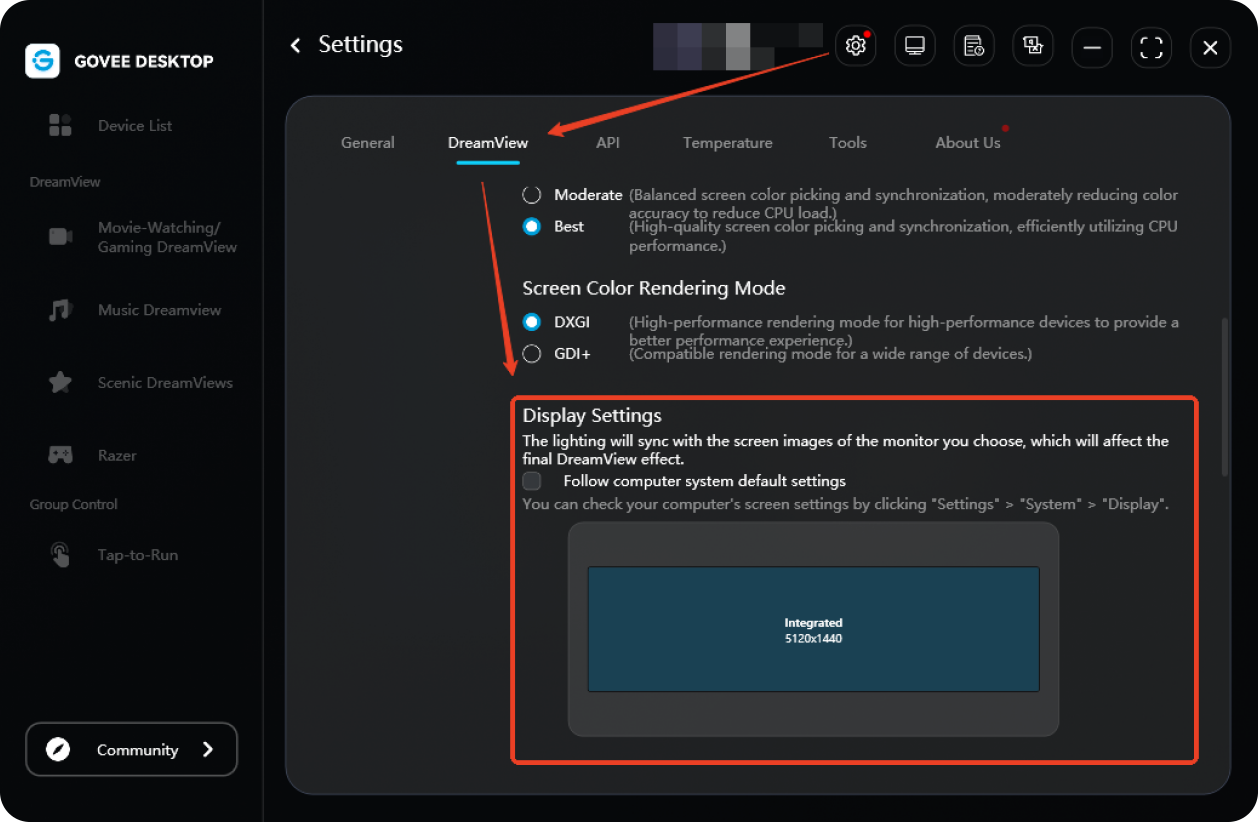
Lock Screen Settings: After enabling “Automatically reduce screen brightness after screen locked” in the “Settings”, the lighting effect under Movie-Watching/Gaming DreamView in the locked state will be automatically turned off, and all the lights will go out accordingly.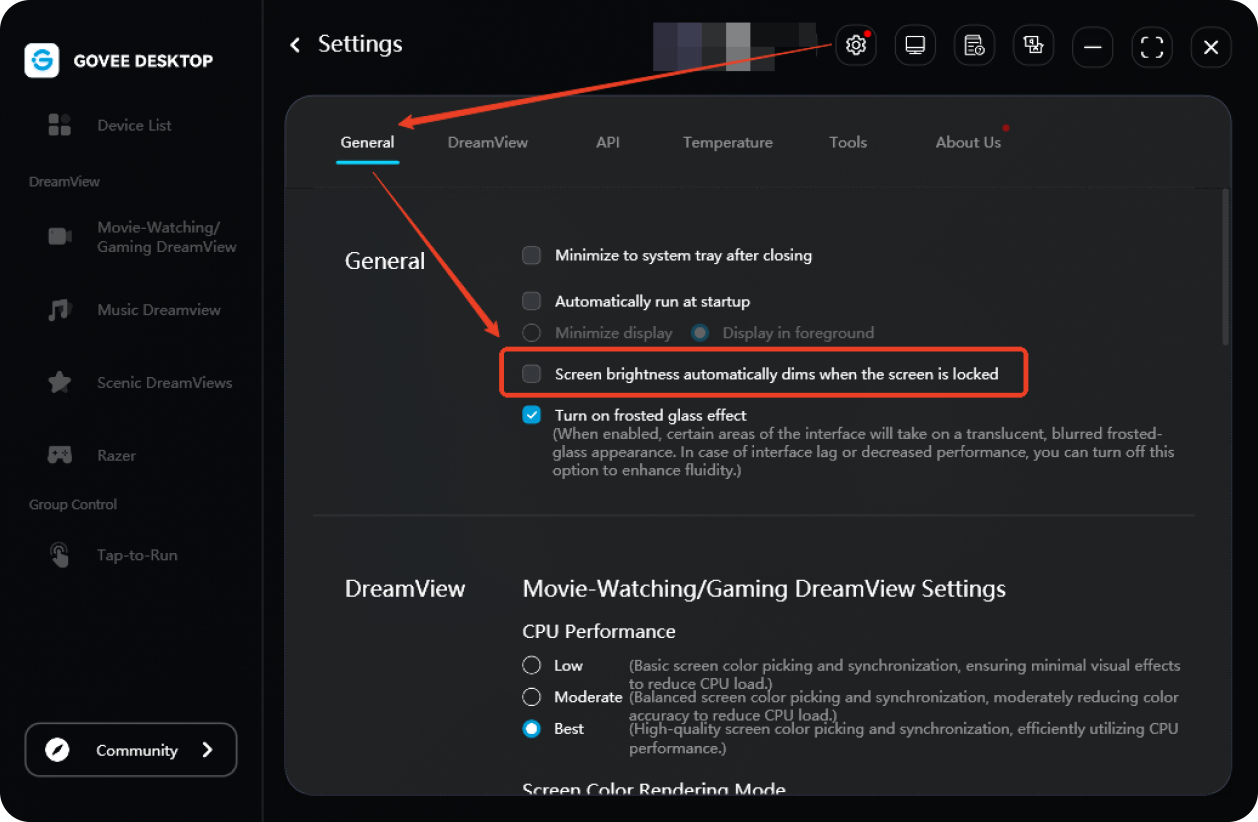
Performance Adjustment: To balance the lighting effects and computer performance, you can adjust the CPU performance mode by entering “Settings” – “DreamView” – “Screen Color Rendering Mode”. You can choose a lighting effect that focuses more on lower system resource usage or a more dazzling one based on your computer configuration.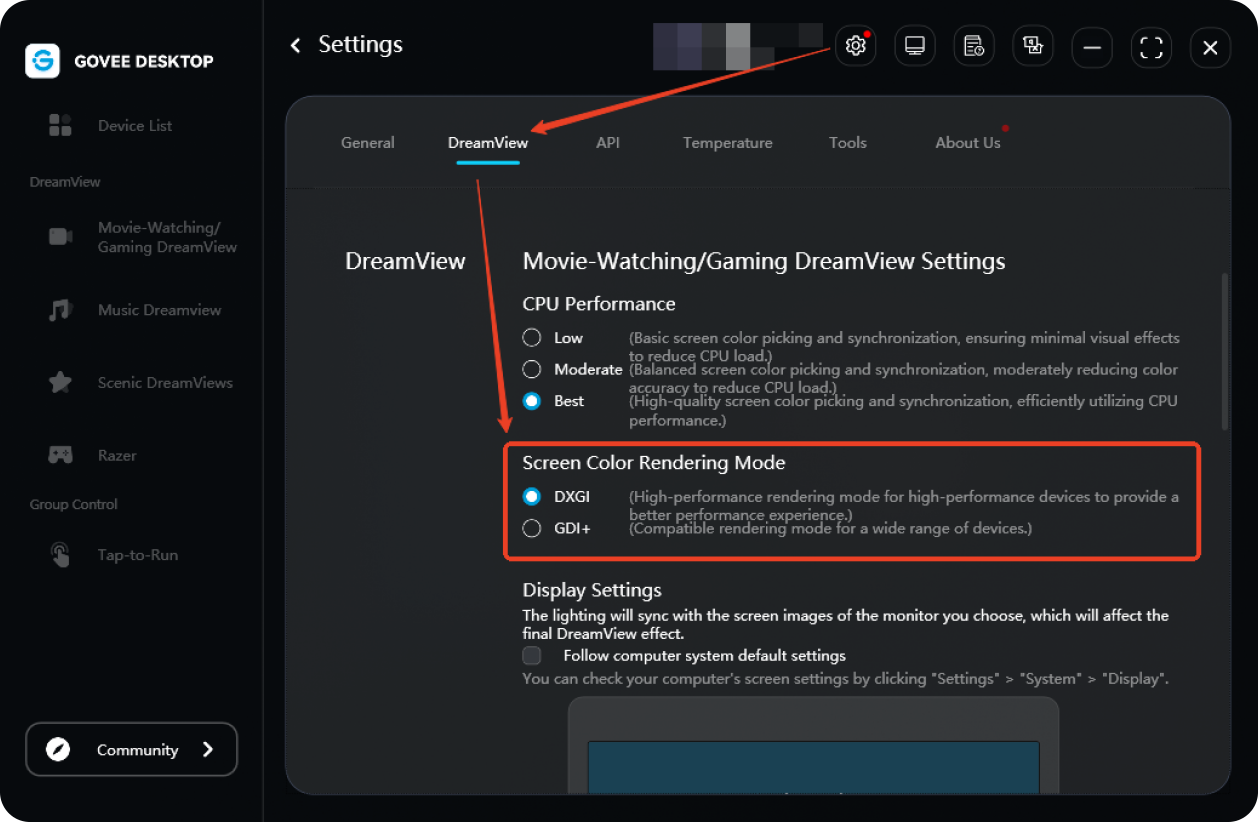
Music DreamView Feature Explanation
Feature Introduction
Synchronously converts real-time audio played on your computer—such as music, game sounds, or movie audio—into dynamic lighting effects, creating an immersive audio-visual atmosphere.
Create and Set Music DreamView
Step 1: Create Music DreamView and select devices
Click to create Music DreamView, and select corresponding lighting devices from the list.
Note: If the device checkbox is hidden, it indicates that it is unavailable. Hover the mouse over the device list to see why:
Device does not support Music DreamView (Please go to “Devices Supporting PC” – List of devices supporting Music DreamView).
LAN is not connected (make sure the device is plugged into power, connected to Wi-Fi, and share the LAN with the computer).
Step 2: Select and Adjust Effects
Select Effect Mode: Select the preferred lighting style (such as spectrum, rhythm, energy, etc.) in the “Effect” section. Different modes will present unique dynamic performances.
Adjust Parameters: Once you select an effect mode, you can adjust the following parameters in real-time based on your preference (please note that adjustable parameters vary depending on the mode).
● Brightness: Controls the overall light intensity. (To adjust a specific device individually, drag the brightness slider on to its corresponding device card in the control panel.)
● Sensitivity: Controls the pace of lighting transitions.
● Color: Customize the primary color tone or color transition range of the lighting.
Razer Chroma Connect Feature Explanation
Feature Introduction
Connect Govee lighting devices connect to the Razer Chroma vibrant ecosystem and uniformly control the lighting effects through the Razer Synapse software.
Connection and Activation Steps
Step 1: Create Razer scene and select devices
○Create Razer Chroma Connect on Govee Desktop and choose the Govee devices you want to add.
Note: Device requirements should support normal Razer, Wi-Fi, and LAN connections. To check if the device supports Razer, click on “Devices Supporting PC” > Support Razer to see if your device name is listed.
Step 2: Install Razer Synapse
Make sure you have installed the latest version of Razer Synapse 3 (or above). Click here to visit the official website to download.
Step 3: Install Chroma Module
In Razer Synapse, make sure you have installed CHROMA CONNECT, CHROMA VISUALIZER, and CHROMA STUDIO modules.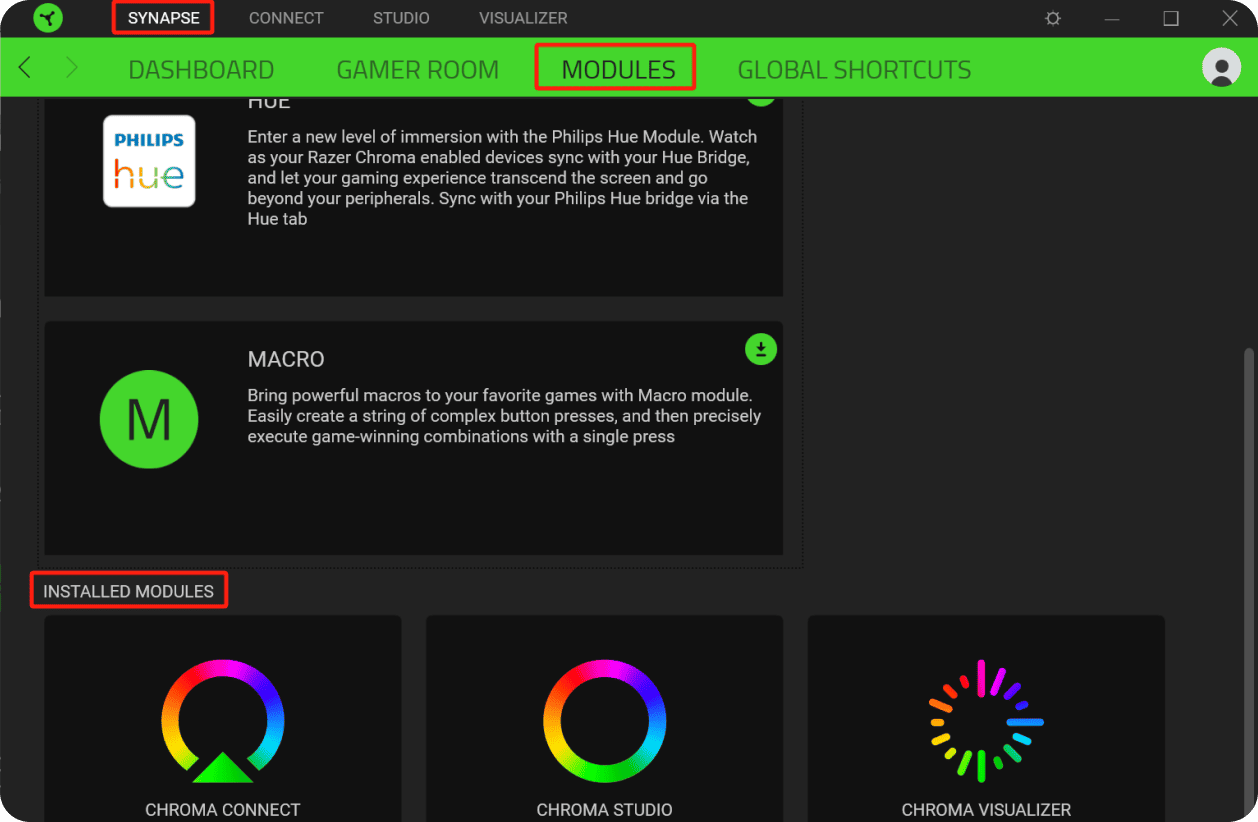
Step 4: Enable Govee Connection
In Razer Synapse, enter “CONNECT” – “DEVICES” page and enable “Govee”.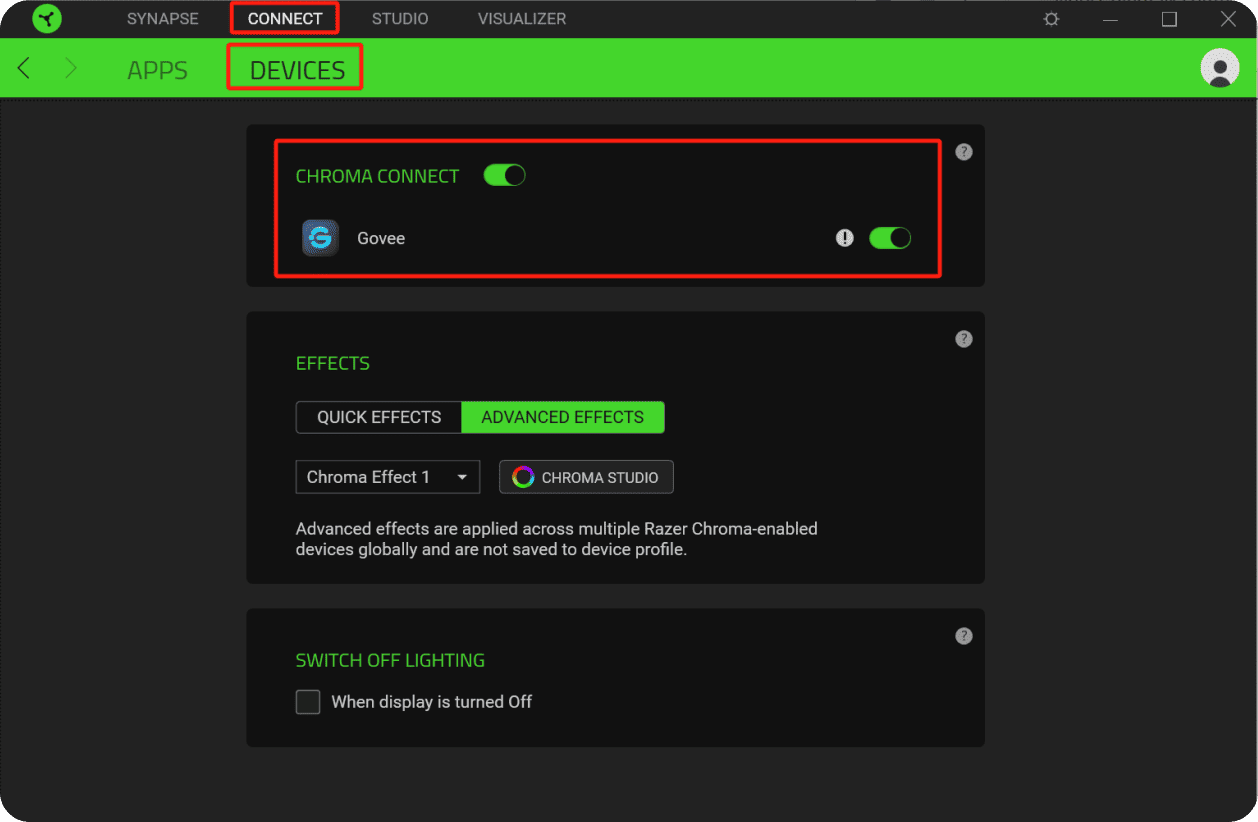
Step 5: Control and Effect Application
Enable this “Razer” scene in Govee Desktop.
The participating devices will enter the Razer-controlled state, and their lighting effects can be controlled through CHROMA STUDIO (custom effects) or CHROMA VISUALIZER (audio visualization, etc.) in Razer Synapse.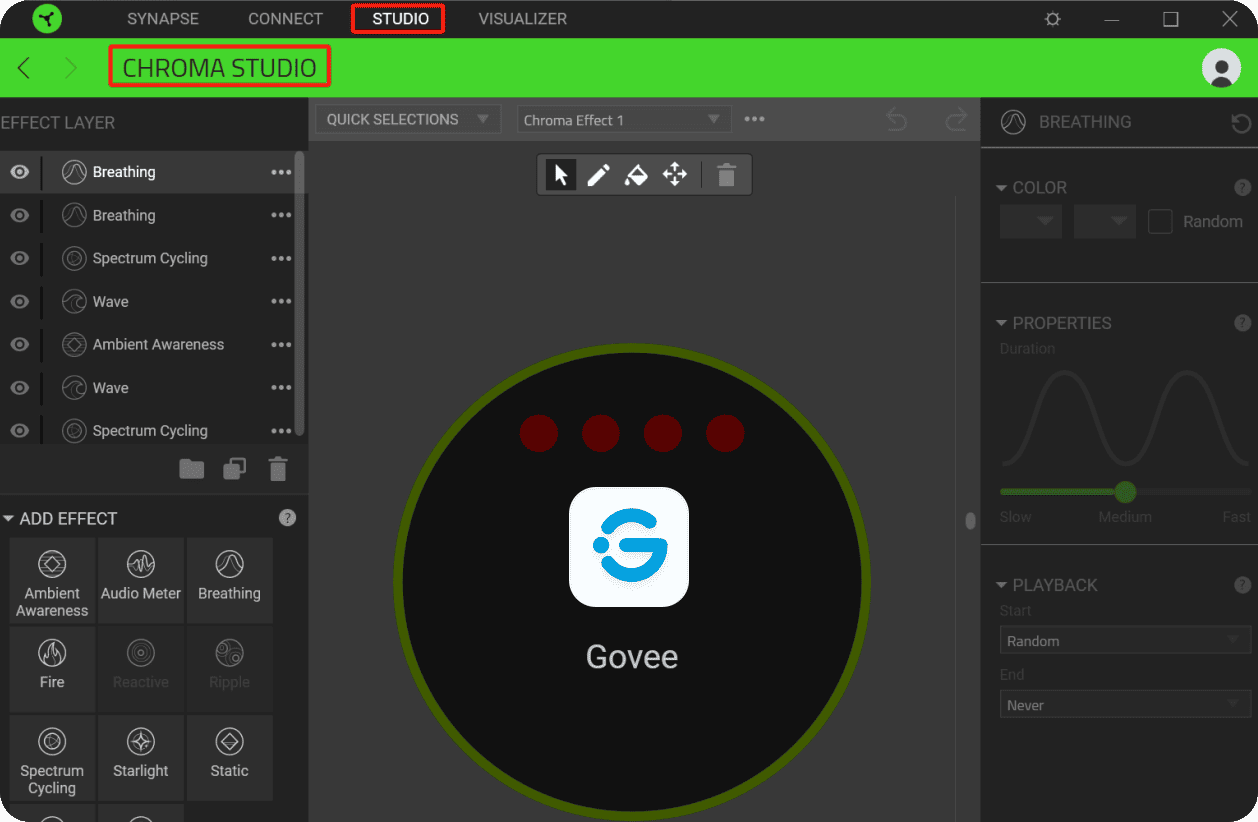
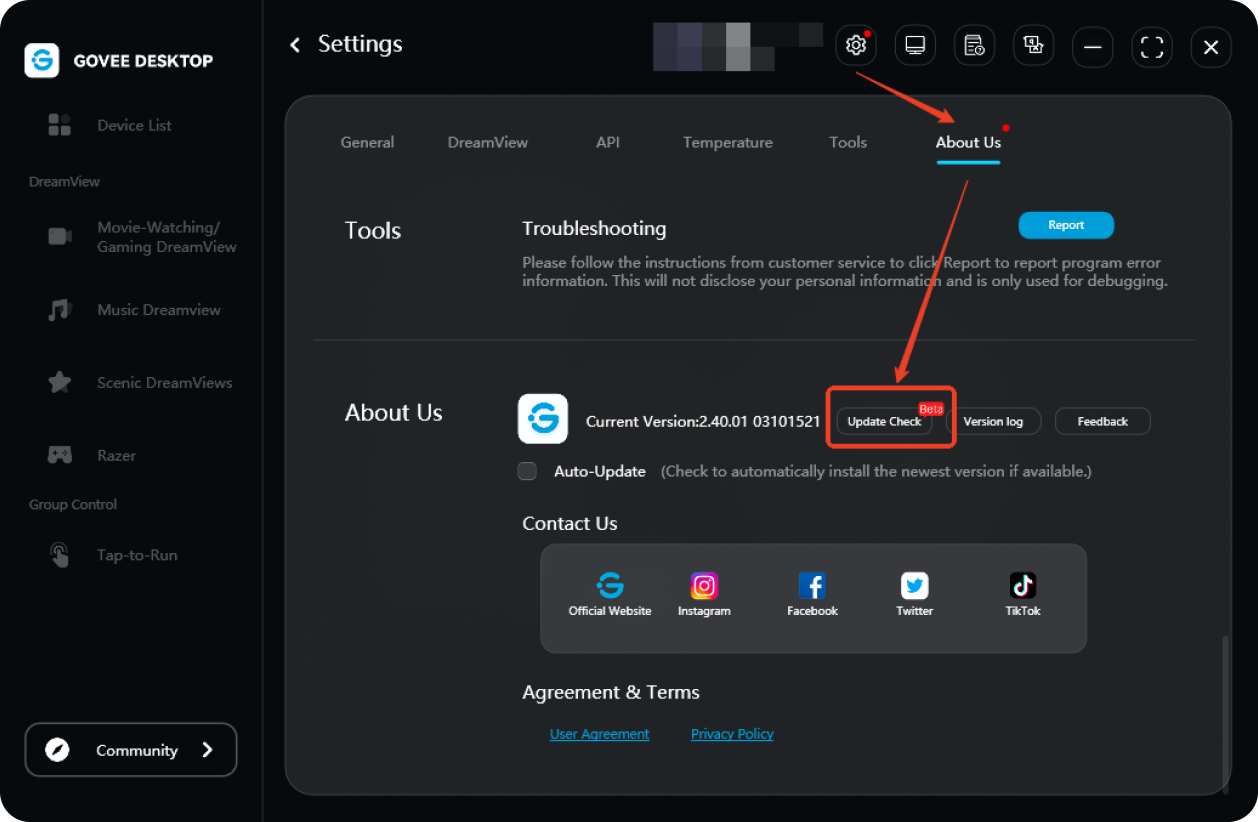
Software Update
Check and update Govee Desktop in “Settings” – “About Govee Desktop”.